
Browse Abandonment Recovery
Browse abandonment targets high-intent users who viewed a product page but did not add it to their cart. This workflow uses a sequence of emails to rekindle interest while employing smart branching logic to ensure users are skipped if they have already purchased or are currently in high-priority flows like Cart or Checkout Abandonment.
When to Trigger?
|
Setting
|
Value
|
|---|---|
|
Trigger Type
|
On Event
|
|
Trigger Event
|
Product Viewed
|
|
Who enters
|
Users who viewed a product page but did not add to cart
|
|
When it fires
|
After a defined inactivity window (e.g., 1–2 hours after page view)
|
|
Priority protection
|
Users in Cart or Checkout Abandonment flows are automatically skipped
|
|
Exit condition
|
User adds to cart, starts checkout, or completes a purchase
|
Trigger logic:
A product page view signals purchase intent — but it is the weakest signal in the abandonment funnel. The flow waits 1–2 hours before reaching out to avoid interrupting users who are still actively browsing. Smart branching ensures that users who have already escalated to cart or checkout abandonment are not double-messaged from this lower-priority flow.
Core Focus (Notes)
Critical configuration decisions for this flow.
Priority Hierarchy — Browse < Cart < Checkout
Browse abandonment is the entry-level intent signal. If a user is already in a Cart Abandonment or Checkout Abandonment flow, they should NOT receive browse abandonment emails simultaneously. Always configure the condition check to verify the user is not already in a higher-priority flow. Over-messaging at this stage increases unsubscribes without improving conversion.
The 1–2 Hour Wait Window
Sending a browse abandonment email too quickly (under 30 minutes) feels invasive — the user may still be on your site. Waiting more than 4 hours risks losing the moment. A 1–2 hour delay is the standard sweet spot. Test 1 hour vs. 2 hours for your audience.
Email 1: Subtlety Over Hard Sell
Browse abandonment emails should feel like a helpful reminder, not a sales push. Show the product they viewed, include the product name and image, and frame it as “We noticed you were looking at this” — not “Buy now before it’s gone.” Urgency works better in Email 2, after they have ignored the first nudge.
Email 2: Introduce Social Proof
If the user did not act on Email 1 after 24 hours, Email 2 should answer the unspoken hesitation. Show customer reviews, ratings, or UGC photos of the product. Let other customers do the selling. A 4-star average with 200 reviews is more persuasive than any copy you can write.
Exit Logic Is Non-Negotiable
The flow must exit automatically if the user adds to cart, starts checkout, or completes a purchase at any point. Failing to configure exit conditions means you send irrelevant emails to users who have already moved forward — damaging trust and increasing opt-outs.
Flow Architecture

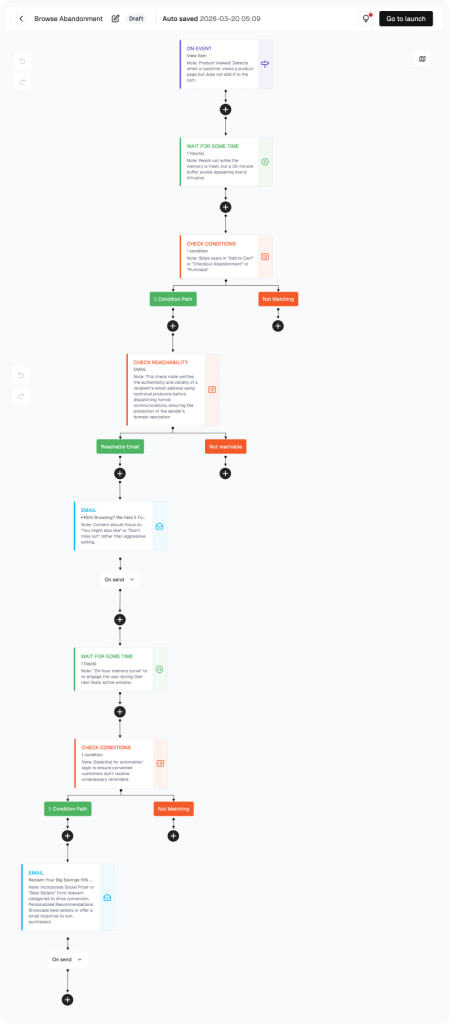
How to build this flow:
Steps below cover the flow canvas setup. Account setup and Shopify connection are in the Help Center.
Navigate to the Flow Section
Look at the left sidebar in FosterFlow. Click on “Flow.”
You will land on the “User flows” tab. This page lists all your flows. Each flow shows: Flow name, Flow ID, Status (Draft, Active, or Paused), Channels used, Start and end dates, Send count, Open rate, and Click rate.
You may see a default flow called “Welcome Sign Up Customer Copy 1” with a Draft status. You can open and edit this one. Or click “Create flow” in the top right corner to start fresh.
Open the Flow Canvas
Click on the welcome flow name to open it. This takes you to the visual automation canvas — the heart of FosterFlow’s email flow builder.
The canvas shows your entire Shopify workflow as a visual map. You will see nodes connected by arrows. Each node represents a step in the automation: a trigger, an email, a wait period, or a condition check.
At the top right, there is a “Go to launch” button. You will click that when you are ready to activate the flow. For now, configure each node one by one.
Configure the Trigger: On Event — Sign Up
The first node in the canvas is the trigger. This determines when a customer enters your automated welcome email flow.
Click on the trigger node. A configuration panel opens. It shows “On Event” as the trigger type. Set the event to “Sign Up.” This means any user who signs up on your Shopify store will enter this flow immediately.
You will also see an “Additional Segmentation” option to target more precisely — for example, sign-ups from a specific country or traffic source. For a basic welcome email automation, the default Sign Up trigger works perfectly.
A note at the top of the panel confirms: “This sequence delivers an immediate welcome to new registrants.”
Design the First Welcome Email
Click on the first email node in the canvas. The email editor panel opens. Fill in the following:
· Campaign name: Welcome Sign Up Email 1
· Subject line: “Welcome to {BrandName}! Here’s a little something to get you started”
· Preheader: “Open for your exclusive discount and a quick look at what we stand for.”
The subject line uses a personalization tag ({BrandName}) to insert your store name automatically. The preheader text appears as a preview in the inbox — make it compelling. On the right side of the editor, the Preview section shows both Inbox and Email views. Use these to check how your email looks before sending.
Important: set Frequency Capping to “Bypass Channel Frequency Capping.” This ensures the welcome email always sends, even if the subscriber has received other emails recently. Your first impression should never be blocked by frequency limits.
Add a Wait Step (2 Days)
After the first welcome email, do not send the next one right away. Give your new subscriber time to read the email, browse your store, and maybe use their discount.
Click the wait step node. The panel shows “Wait for Some Time.” Set the wait time to 2 days. A note in the panel explains: “Allow 48 hours for the user to browse and apply their discount.”
This 48-hour gap is a sweet spot for most welcome email series. It gives enough time for the subscriber to act, but not so much time that they forget about you.
Add a Condition Check: Did They Purchase?
This is where your email flow gets smart. After waiting two days, you do not want to send a “your discount is expiring” email to someone who already bought.
Click the condition check node. The panel shows “Check Condition.” Set the condition to: Purchasing behavior (Standard) — User’s Total Purchase Amount is less than 1, in the last 2 days.
This creates two branches on your canvas:
· Green path (Check path): Users who have NOT purchased. They continue through the flow and receive the follow-up email.
· Red path (No matching): Users who already purchased. They exit the flow. No unnecessary nudges.
A note in the panel confirms: “Automatically identify converted users to avoid useless nudges.”
Design the Follow-Up Email for Non-Buyers
Click on the second email node (on the green/check path). This is the email sent to subscribers who did not purchase within two days.
· Campaign name: Welcome Sign Up Email 2
· Subject line: “Don’t just take our word for it… Plus, your gift is expiring!”
· Preheader: “See why our community loves {BrandName}! Your code expires soon.”
This email uses two powerful tactics: urgency and social proof. The urgency comes from the expiring discount code. The social proof comes from showcasing your community and real customer love. Together, they push undecided subscribers toward their first purchase.
After configuring this email, your automated email sequence is complete. Click “Go to launch” in the top right corner to activate the flow.
PERFORMANCE & REVIEW
Core Performance Dashboard
Monitor in FosterFlow → Flow List after activation.
|
Metric
|
What it tells you
|
Target benchmark
|
|---|---|---|
|
Send Count
|
Total browse abandonment emails sent
|
Tracks browse intent volume
|
|
Open Rate — Email 1
|
Initial reminder open rate
|
≥ 30%
|
|
Open Rate — Email 2
|
Social proof email open rate
|
≥ 22%
|
|
Click Rate — Email 1
|
Product page revisit rate
|
≥ 6%
|
|
Add-to-Cart Rate
|
% who added to cart after receiving Email 1 or 2
|
≥ 4%
|
|
Flow-to-Purchase Rate
|
% of flow entrants who eventually purchased
|
2%–6%
|
Where to find it: Flow section → click flow name → metrics in the list and canvas header.
PERFORMANCE & REVIEW
Review Dimensions
Use after the flow has run for at least 2 weeks.
Open Rate below 25%?
Check trigger — is ‘Product Viewed’ firing correctly for the right pages?
Revisit subject line — ‘Still thinking about it?’ outperforms generic subject lines
Verify domain authentication for deliverability
Low add-to-cart rate despite good open rate?
Is the product image rendering correctly in the email?
Is the CTA linking directly to the product page (not the homepage)?
Consider adding pricing or a free shipping reminder to reduce friction
High exit rate at the condition check?
This is often good news — users are converting to cart or purchase
If the exit rate is high AND purchase rate is low, check if users are adding to cart but abandoning there
A/B Test Opportunities:
|
Element
|
Variant A
|
Variant B
|
|---|---|---|
|
Wait before Email 1
|
1 hour
|
2 hours
|
|
Email 1 tone
|
Soft reminder
|
Direct product feature
|
|
Email 2 content
|
Customer reviews
|
UGC photos + star rating
|
|
CTA in Email 1
|
'Take another look'
|
'Pick up where you left off'
|
Summary
The Browse Abandonment Recovery Flow re-engages the highest-intent users at the top of the abandonment funnel — those who looked but did not act. Smart priority logic ensures it never interferes with higher-converting cart or checkout flows.
What this flow delivers:
· Trigger fires on product page view with a 1–2 hour wait
· Priority check ensures no conflict with Cart or Checkout Abandonment flows
· Email 1: subtle product reminder while intent is fresh
· Email 2: social proof and reviews to overcome purchase hesitation
· Automatic exit when user adds to cart, checks out, or purchases
This flow runs 24/7 with zero manual effort.
Ready to set this up?
Head to FosterFlow (fosterflow.ai) and activate this flow in minutes.
1,000 emails/month, no credit card required.